Tuesday, October 25, 2011

Yak Yak Yak - less talk, more sailing

Someone mentioned they would like to see a conversation on sail trim etc. on the Gemini, here’s my effort to start it.

For reference I have eliminated the backstay and replaced it with a boomkicker and installed a 5:1 soft vang and the vast majority of my lines are led aft.
I'm going to front load the pictures..enjoy:
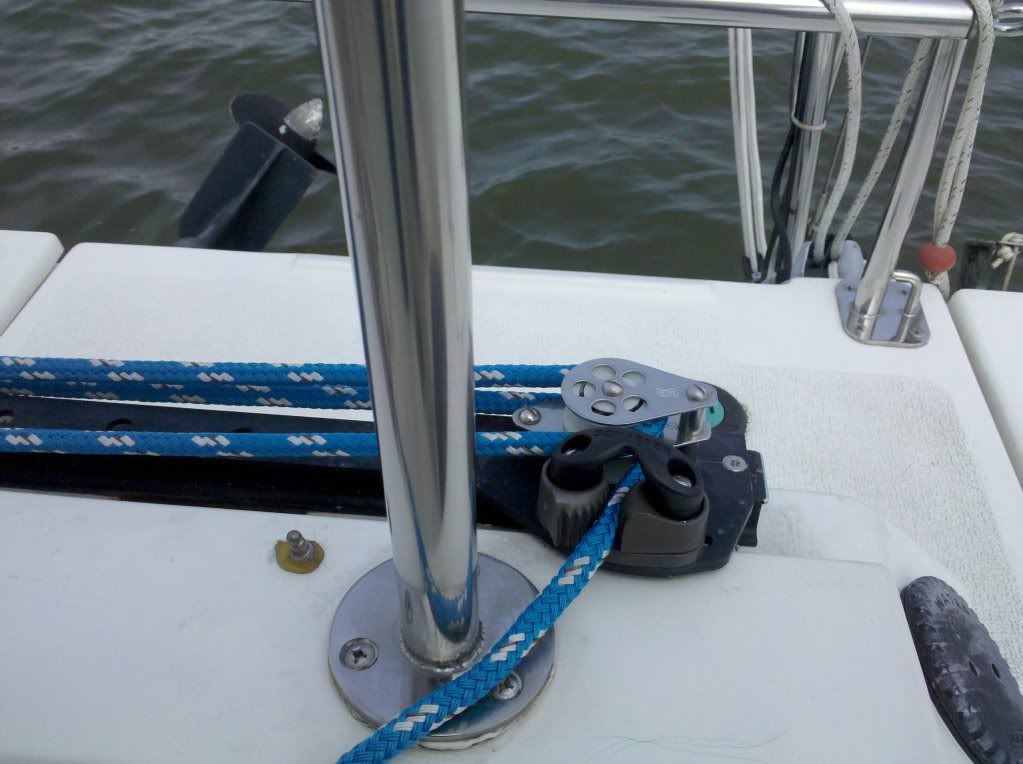
My traveler has the modification for control lines vs. pin stop


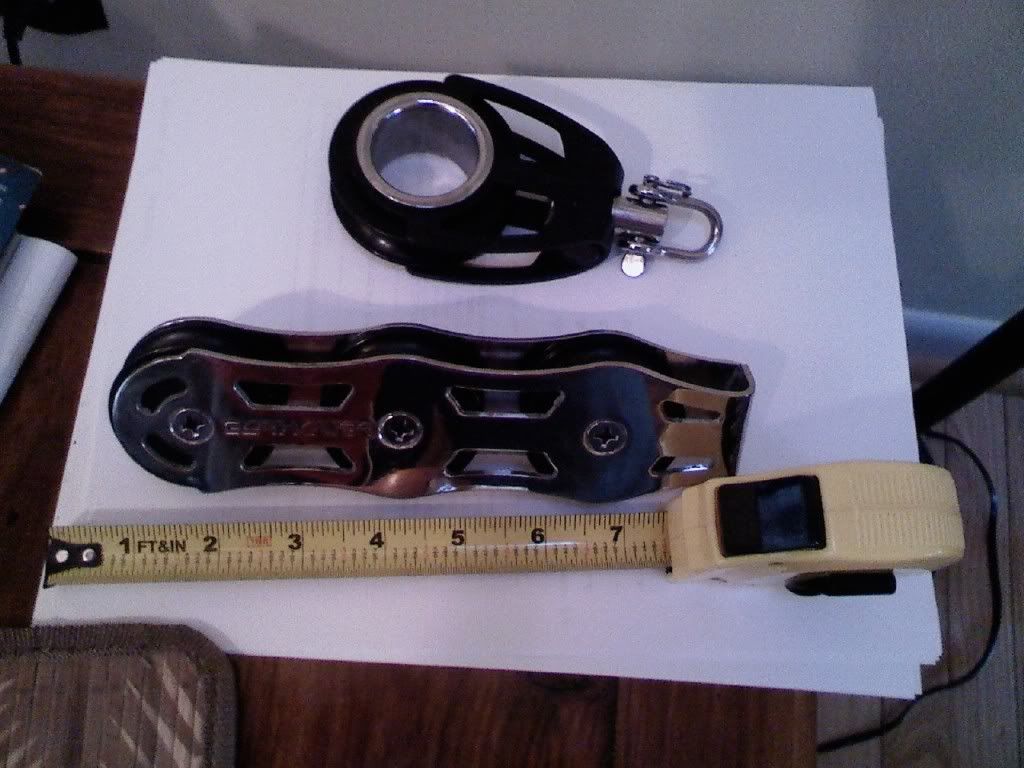
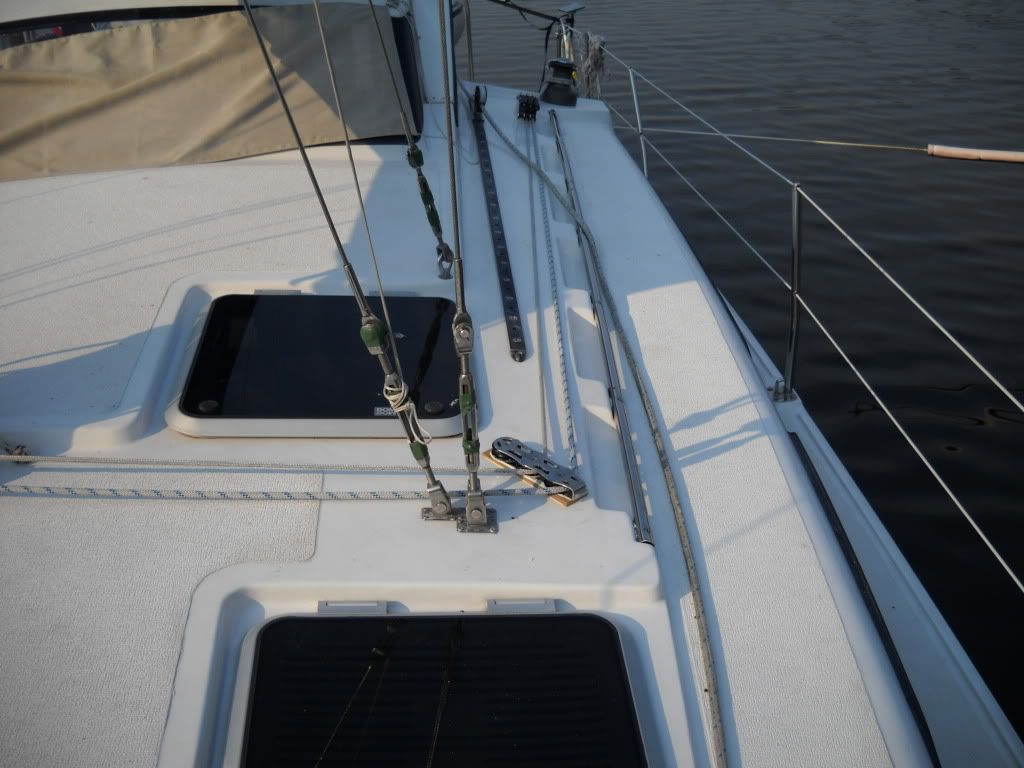
Block to lead sheet from mast and turning block to lead aft. 


 Mounted, port side (still in progress when this taken)
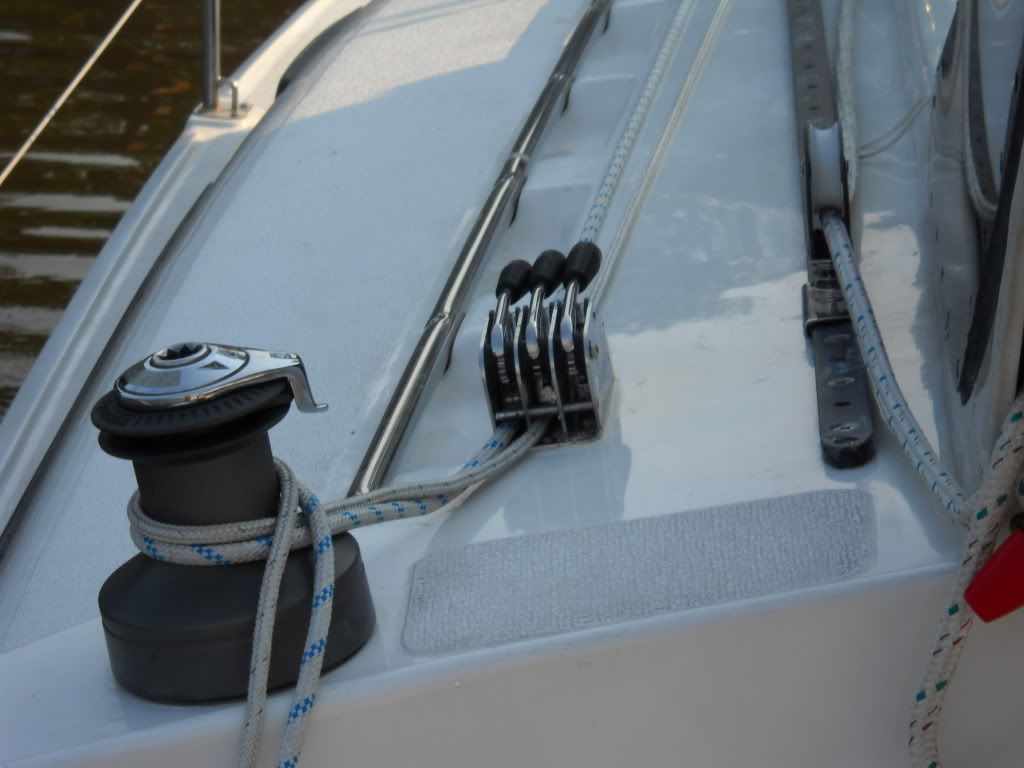
 Garhauer 3x stainless clutch


 Mounted


 Blocks to take (in this case) the topping lift and the main halyard (blue checked) to the turning block - and from there to the clutch


 Okay - that's your visual fix - now to the yak yak yak part...


Back stay use on the Gemini –

From the manual:

* The back stay should be tightened to the point
where all slack is eliminated but with no bow or
bend in the mast. The check stays are present only
to eliminate mast pumping and are tightened to the
point where there is just a small amount of slack.
The baby stay should be tight enough to put a small
pre-bend in the mast so that when the Genoa pulls
forward in heavy wind, the mast straightens up.

As a side note in 2009 we had a massive snow storm (Annapolis Md area) that contributed to sinking a Gemini at the pier because the backstay chain plates had ¼ cracks – my conjecture is that the tension was left on too much, too long.
The weight of the snow submerged the top step, once water got in it was just a matter of time.  Like the manual says, release the tension on the backstay while not sailing (and for downwind work). It should have no slack, but not be tight while at the pier or motoring. I’ve spoken of this in other posts, it’s searchable.
If you follow boating news there was a Tartan 4000 that was essentially totaled by what Tartan ascertained was ‘excessive backstay tension’ – it cracked the stern and amidships. Your mileage may vary, but my opinion is to use it sparingly.
Selden and PCI designed the mast to be mostly straight and need minimal adjustment. That’s per a conversation I had with Tony in 2008.

Putting tension on the backstay pulls the mast top back which has the effect of pulling the genoa or screacher luff tighter. It works in combination with the baby stay forward to put a slight (very slight) curve/bend in the mast. That bend works just like a beer belly on a tee shirt – it pushes the belly of the main sail forward and tightens it up in the middle section while at the same time the top bending back (even an imperceptible amount from the deck) has done its work on the genoa or screacher.  For me sparingly translates to pulling the slider down about 2 feet for maximum tension. I might not get as much as I could, but I’ve not broken anything.
For windward work this improves pointing and sail shape of the fore sail. The luff of the foresail is where the ‘speed’ comes from, so the better it’s shape the better the airflow through the mid section because the air doesn’t separate from the sail curve prematurely.
This is turn creates a better slot between the genoa and the main. The slot accelerates the air that flows over the leeward side of the main – increasing its efficiency.

For reaching – less tension is needed but truly the best gauge is the gauge (speed log or GPS) – play with the backstay tension and see where the best performance is. One of the best things I’ve done is go out single handed so I KNOW where everything is set or changed and I can see the changes good or bad on both balance and speed.

An often overlooked control device are the jib leads, the Cunningham and  the outhaul. Dave Berig put a Cunningham in the main but most owners I’ve seen don’t have it rigged for use. The outhaul is left at the mast (the center ‘gold and white’ on my boat) and underused as well. Mine was so short I’d have had to lay on the deck under the mast to do anything with it. Instead I lengthened mine using a sheepsbend knot, put a block at the mast base and lead it back aft – right now on the port side but this off season I’m reorganizing the lines so that the port side will have the main halyard, first reef (clew) and first reef (tack) led to a 3 slot clutch (it’s main halyard, outhaul and vang now). I’m putting the outhaul, vang and Cunningham on the starboard side so all the main sail controls are at the helm.
All of these controls work the same on the Gemini as they do on Half-boats (mono hulls).

I just this season mounted  the boomkicker and vang so I’ve got minimal use – but the vang is VERY handy for downwind sailing – it stops the boom from lifting and helps (with a preventer) to keep the boom from bouncing all over in the chop we get here on the Chesapeake. My vang is loosely mounted (1 screw to the boom) – with the intent I’d rather it pop off than my boom break.  Obviously I’m still experimenting with it.
I run a preventer from the back of the boom (snap shackle) to the a block that is attached to my anchor cleat and then back aft to the winch. I get full adjustability out of it that way. If I’m wing on wing I move it to the jam cleat so I can use the winch for the genoa/screacher sheet.

Cunningham’s are the cringle on the luff of the main about 4 feet up from the boom. You can crank away at the main halyard and put it mostly right – but a simple line with a figure 8 stopper tied through the Cunningham lets a 120 pound weakling pull out more slack from the mid-bottom section with minimal effort. It’s useful to both create or eliminate more curve in the luff of the main (create for downwind, eliminate upwind.
Ditto on the outhaul – pull tight for upwind and or heavy air – slack off for more power in choppy water or ‘bag’ going downwind. I’ve not noticed a significant difference (yet) – but on my buddies 216 Hunter it makes a wow difference.

Leading both the reef clew (back of the main) and the tack (cringle on the sail with a stopper knot and rope led aft) in the cockpit makes it as close to a single line reefing system from the cockpit as we can get without replacing the boom. Putting in on the same clutch as the main halyard makes it a simple job, e.g. lower the main to a pre-marked spot on the halyard, pull the reef clew line (blue on mine) until the clew is all the way down, pull the in rope attached to the reef tack until tight, readjust halyard for final. Since I’m a weekender/daysailer at the moment I don’t envision a need to lead the second reef aft (that’s the polite way of saying I have a motor for when the wind gets that high).  

Jib leads should be set based on the amount of genoa you are using – I’ve found that about I foot behind the window (almost all the way back) is good for upwind, full genoa. Downwind work seems to improve by sliding them forward about 6 feet – it helps the clew of the genoa get out there in good air. Somewhere about half way (mid boat) works good on reaches because there you need to open the slot a little and get the wind flowing on the back of the main.  Real racers mark the deck or track with where they want the cars.
A simple relatively inexpensive upgrade is to put make your jib lead cars ‘towable’ – put a block and termination (shackle) at the bow end of the track and another block on the car – lead a control line from the shackle through the block on the car back to the block at the end and then back to a clutch/cam cleat at the helm. The pressure of the genoa will (on release) move the car back towards the stern – and you have a 3:1 purchase to pull the car forward. Kits sold in pairs to do this run about 250-300 bucks.

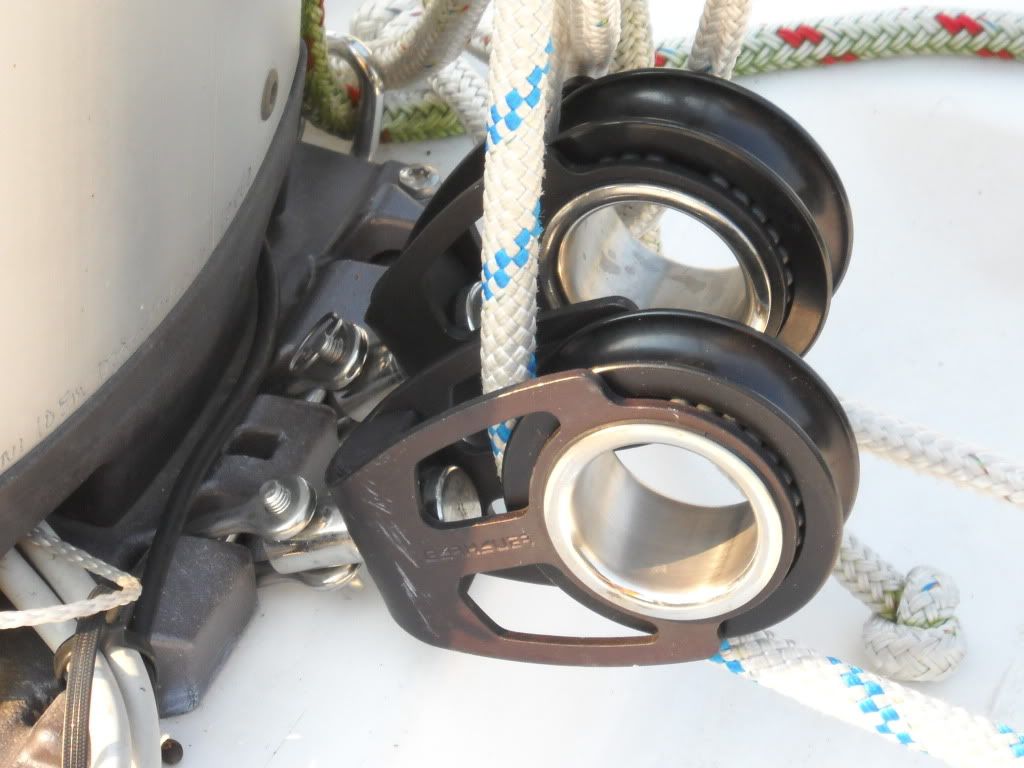
By the way, I’m using Garhauer 40mm swivel blocks for all this – 25 bucks at a boat show. I picked up 6, the shackle goes right through the pin at the base of the mast simply. My turning blocks are 40mm sheeves-  stackable 3 space Garhauer’s – make sure you get the models with captive bearings or they will scatter everywhere J. You’ll need to bevel a plate / teak piece to level the turning block. Mine are mounted just off  the hatch and angled to lead all lines ‘just’ inside the winches.
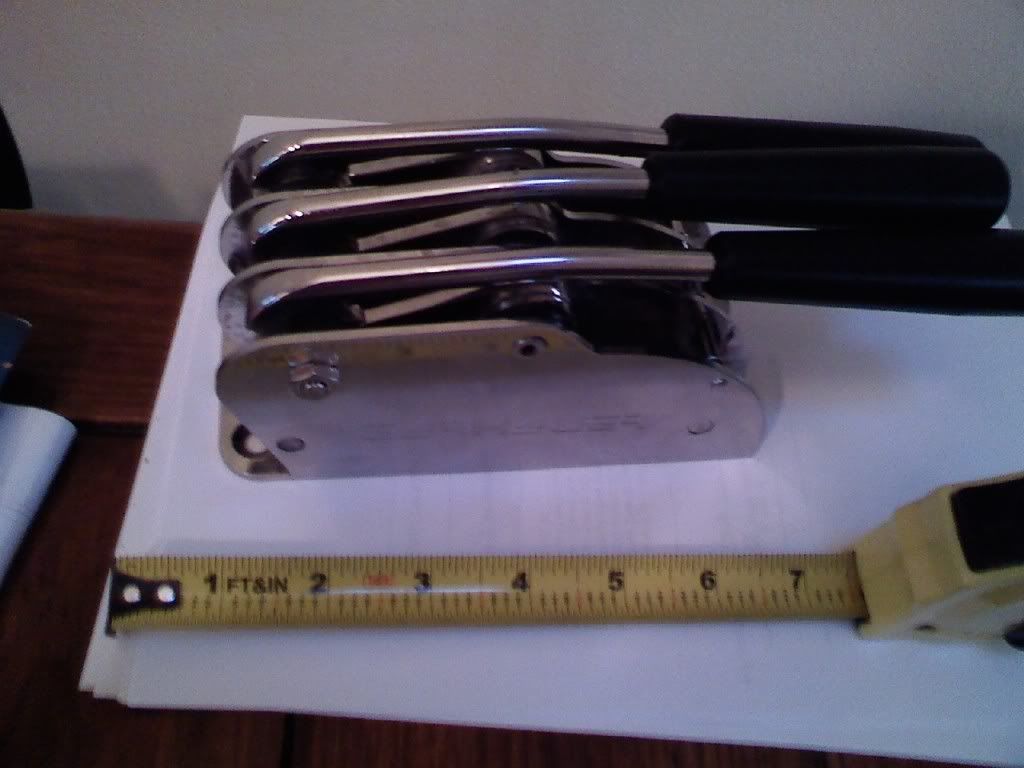
Garhauer is heavier generally, but stronger. I also use their stainless steel 3x clutches. Drilling and mounting is simple. Keep in mind that the forces are primarily sheer (side load) not lifting – except at the block.

I don’t generally put a lot of pictures here but do have them on Anything-Sailing.com and on my blog.

Tuesday, October 18, 2011

 Rescue on the high seas it's not - but it is a common occurrence. Below is the view outside my home office window. The boat with no sail up has run aground in a marked channel that is often misread/misunderstood. The boat with the sail up has just thrown a line to him and is starting to tow it backward out of the channel.  See bottom of post for the chart and how to read it.  Click to enlarge.

 A little bounce on the line
 Underway

The big fellow to the right stopped to watch. Isn't the wave design on my stack pack lovely - makes my boat look like it's moving huh?

Here's the chart  for the area (click to enlarge)
In the pictures above you can see the #2 (green) and #15 (red) daymarks (poles with signs for the non-boater). They are too the left of the boat with no sail up - he was attempting to go up the middle of them.
Normally, yes - that's what you do.
BUT, the mnemonic is "Red Right Return"
In english instead of sailor garble that means keep the red mark to your right when you are 'returning'. Returning means going to a smaller body of water.
This fellow that ran aground was coming down the Magothy and proceeding past the #15 mark - he's not returning - he's heading for the Chesapeake bay.
That big boat in the last picture has just passed the day mark shown on the chart as MR....
It's a green over red in the middle of the creek - that means "safe to go to either side of me" - when you take that in context with the #2 (red) it means literally keep me to the right and proceed up the creek to the left. if you are going up the right hand side - which is continuing up the Magothy River  it means keep me to you left and proceed to the next mark - which is #15 (green) - and green should be kept on your left.
What it (day mark MR) does not mean is split the next to. Note the numbering. #15 belongs to the Magothy River - it's the 15th mark on the way UP the river. #2 is the second mark on the way DOWN the river.

There was never any danger, the tide was out and he'd have eventually floated off. Heck he was in 2 feet of water (at the bow) he could have jumped over and pushed himself off.
Power boats "anchor" here by putting the bow on the sand bar then swim for hours all summer long.

See, Charts are easy to read - and Oh, By the way - I live at scoop of land in the upper part of the chart - the little black line sticking out is my pier - it points directly at the #2 and #15.

Wednesday, October 12, 2011

Monkey Snot

Sailors always have colorful names for things on boats, we all know that. I mean really.
We can pretty well figure what a Boom is - it's the horizontal tube under the main sail that hits your head and goes "boom" just before you see stars and fall over. Boom vang on the other hand is just enough to make you go "what". I mean, okay - it pulls the boom and therefore the main sail down - so what language root is it that vang comes from?

So what's this Monkey Snot stuff anyway? Back when I was wearing Uncle Sam's Canoe Club uniforms (US Navy) we had this gray putty goop that we used to seal stuffing tubes. See, you just can't write a sentence about boats without a glossary.
 A stuffing tube is a hole in the bulkhead (wall) that has a wire or something else running through it where you don't want the wire to be permanent. You stuff the putty into the hole to stop air, smoke and water from coming through. In warm weather the putty tended to soften to the consistency of, you guessed it, monkey snot.

What's that got to do with a modern sailboat? Funny you should ask.

Deck hardware (cleats, tracks, shrouds, turningblocks, cams, etc..) all have holes from the bolts that hold them down, those holes go through the deck and are fastened. Holes equal leaks, leaks equal water inside the boat. The only water desired inside the boat is used for ice cubes to chill the Rum (or I guess the beer for those that do).
Even small amounts of wetness means mold, mildew and possibly rot. So we seal the holes around the bolts and under the hardware. It's called bedding the hardware because we are sailors. We can't just call it sealing the deck underneath the what-cha-ma-call-it. It's not allowed.

If just anyone could speak the lingo we would not be special, and I don't mean ride the short bus to school special. We really don't make it up, everything has names or terms.

So, for the past several lifetimes Marc and I have been re-bedding his hardware on his Coronado 25.
The process is pretty simple to describe, not so easy to do sometimes, especially on a older boat.
You take off (unbolt, screw and pry) the old stuff, clean thoroughly with various toxic and or flammable substances and then apply the goop of your choice to seal it and bolt it back on.
After long discussions and much research Marc decided to go with my old favorite for the goop of choice.
Monkey Snot. Known to others as butyl tape.

Here's some pictures.  I'm going to make them small, you can click to enlarge.
A stanchion, 32 years old, slow leak into the cabin below.

One of the bolts had stripped and needed to be hack sawed off.  We weren't smart enough to take pictures of one step by step, so this one is different, but you can see the dried up snot (caulk) from the original installation.  Cleaned, counter drilled (you open the hole a little at the top to prevent gelcoat cracking, lay some tape around and then put little rings of snot around the bolt helds..


Then you bolt it back down again.
Note the razor blade. When you tighten the bolts it squeezes (oozes is a much better descriptor) the monkey snot back out all around. The snot also shoots out from under the bolt head itself. Nice large splooges of snot show you got a good seal.
Rinse, wash and repeat. On Marc's 25 footer that means a multi day process, I think we have been going at it for a weeks worth of days now.
A lot of that is because previous owners have done it 'their' way. The photo above shows where I have removed and (believe it or not cleaned under) one of the stanchions on the stern, these were simply screwed on with wood screws so they needed to be drilled out and then done right to the "Marc and Chuck" standard which in this case meant bolts,  big fender washers, monkey snot etc.. Poor Marc had to spit out 40 bucks for bolts and such just for these four posts.

Now, we are two normal guys..I'm just saying, we didn't pose for these pictures, we just snatched a camera here and there and took a shot.

Here's what I'm saying - in case either of the Admirals ever reads my blogs -
not one can of beer or frosty cup of Rum is in any of these shots. We work long and hard hours under conditions of dehydration to get this done. If we hang out until it's too dark to see having a sip of frosty, we'll we've earned it. By the way, bring down a couple of drinks, ours have been stolen.

Busy boat show weekend.

 Generally, I don't intend this blog to be about my day to day stuff. No one wants to know how many cups of coffee I had, or their effect on my bowels. Every once is a while, stuff happens I want to write about.

Between out of town guest and the boat show it's been a busy couple of days, adding in the worlds largest in the water sail boat show on top of that and even a five day weekend can't fit it all.

We were graced with a visit from Cidnie of Ceol Mor fame  coming up from Texas to visit friends and look at some boats. Once she gets home (she's driving) I'll steal some pictures and post them here - with her permission.
I'm not a good photographer in that usually I don't even think to take a picture. Consequently I don't have even a single picture of her :( from the visit.

While he wasn't staying with us our GOOD friend Alex was also visiting from Portugal. Alex is the owner and operator of Giuletta, a newly converted Del Conde 1200 - converted to out right racing.


He was wonderful enough to invite us to sail his boat with him from his hometown in Cascais Portugal around to the Algarve area in June 2009. It was some valuable blue water-ish 160 miles off shore sailing experience for both Mary and I. He then hosted us for an additional week while we did the tourist thing in southern Portugal and Lisbon.
What a world we live in. We had never met him until he picked us up at the airport.

Alex was nice enough to let us hoist him up my mast so he could check out my windex (the thingee that points out where the wind is coming from). He fixed a 3.5 year old problem with a simple poke at a gasket. I've really got to get a mast climber.
After doing that we got to see the results of his visit, he was dropping off a custom made assymetrical spinnaker for my friend Craig, here's Craigs boat spanking mine on the Magothy river in a 3 kts breeze. That one sail at 800 square feet is more than the total my boat can fly:


This is the only view I got of it, from behind.

Since I mentioned the boat show, let me leave you with this image. A 20 something foot pilot house sailboat from ComPac. Just because you can doesn't mean you should.

Wednesday, October 5, 2011

How to Sail #2 - Caught in Irons

Caught in Irons

(a nautical term of vague origin, loosely translated as ‘screwed up again, haven’t you)
A common occurance on barges, rafts, square sails, and of course catacondo's.

You apparently tried to tack and did not get the bow to go over far enough or fast enough.

To confirm you are caught in irons check the following (in order):
1) You are not moving or are moving backwards.
2) You are not tied to the pier.
3) The sails are up, one is on the left, the other on the right, the forward one is back winded (see glossary) - and the motor is not running.
If all the above is true, yep, you've screwed up again.

You either just tried to tack or weren’t paying attention and sailed straight into the wind, again.
If no one else is onboard you are safe and might not have to admit your mistake .

If only the Admiral is onboard tell her you intended it for practice purposes and invite her to try to rectify the situation for ‘learning’ (well it worked last time).

If the Admiral was steering the boat and caused it then congratulate her for achieving a perfect ‘hove to’ condition and ask politely (without sarcasm)  if you should bring lunch now.

Actions to take:

Do an immediate scan of your surroundings, i.e.,  look for other boats, hard pointy land based objects etc.
Reason: If you do not see any boats that you know, you do not have to admit your mistake.
If you are drifting in a manner that means you will collide with something or someone put your ego aside and start the motor, then drive the boat to safety.

It’s time to assess the situation. Make sure your drink is topped off, iced down etc. Smoke a cigarette and relax as this is going to take some effort to fix.

Okay, if you are rested up here’s the deal: you’re screwed.

You see..the sails are all out of whack, discombobulated and weird. Again. No, don't panic and go all funny again.

You’ve got to get the boat moving again so you can steer because sailboats don’t turn unless they are moving, but you can’t it get moving because you can’t steer…Chicken, egg, omelet.

Ponder this chicken and egg scenario while having another cigarette. Refill your drink  since after all you aren't exactly moving now are you?

If it is a good spot for anchoring do so, then drop the sails acting just like you had planned on this to happen.

Not a good anchorage? Continue being screwed:

Reassess how far you have drifted, scan for boats etc..If you have run aground the situation is resolved – you can either get out and push the bow around or call for a taxi home.

Still on the water?

You could call TowboatUS again, but they were really pissed last time.

Let’s fix the problem instead, it’s the ‘sailor’ like thing to do.


Put down the drink, put out the cigarette and put a resolved look on your face. Thinking of how Popeye would fix this helps so does squinting and flexing your biceps.

Loosen the jib sheet and remove it from the winch. Let the jib sail flap in the wind – it’s too complicated to work both sails at once in a time like this.

We are going to fix this by turning the wheel to the center and pushing the mainsail out into the wind, that WILL get the boat moving backwards.

It’s also too complicated to try and make sure you end up going in the direction you wanted to tack to, if you could do that you would not have gotten caught in irons, admit it, and live with it.

Go up on the side of the boat and to the back, grasp the boom (see glossary if needed) and push it out (forward) until it fills with wind. Hold unto something with one hand – not your drink, you were supposed to put that down.

When the boat is moving backwards at 1 knot or better you can let go of the boom and go turn the wheel so the boat turns sideways to the wind.

If you pushed the boom to the left, turn the wheel to the RIGHT, if you pushed the boom to the right, turn the wheel to the LEFT. If that does not work, try it the other way. Scowling at the sails doesn’t work, but does help.

That should, eventually, get you going backwards, then stopped, then moving forward. It’s complicated but the good news is it works, sometimes. Well, at least once.

Once moving forward you can trim sails (see ‘trimming the sails’) and get moving like normal.

If that doesn’t work, pull the mainsheet tight, drop the drive leg, start the motor and fix it like last time – motorsail

Monday, October 3, 2011

What makes my Dinghy go (part 3)

All this dinghy talk and you'd think I actually use it.

As promised, I hooked up the bits and threw them onto the dingy:

Then took it for a ride. I didn't have my handheld GPS with me (or a PFD for those observant safety minded folks) but I'd guess-timate that my full up speed was 3 knots. A fast walk.

For convenience, a win. For reliability, a win. For thrills and chills on the water, not so much a win.


Enjoy the views


Oh yeah, and just in case, a reminder on why I did this. Here's a few pictures of the carburetor of a 2006 Yamaha 2.5 HP four stroke after a season of almost no use:

Sunday follies

I"m a Patriots fan, and they don't get much coverage here in Redskin and Raven fan territory - so my Sunday afternoons in the fall are pretty much free.
Just to throw in the odd controversial statement (otherwise why blog right?) - there is only one watchable American sport, and it's played with a oblong ball in the winter. I don't do sports with round balls or pucks.

Back to the topic at hand, free Sundays. I could be out having fun like some of my friends:


But I wasn't invited.

It seems he likes his girlfriend better than me.


I could be out mowing grass and raking leaves, but I tend to do that on week days when there's nothing else to do. I don't like doing 'chores' on a day off and I get no enjoyment whatsoever from a well tended lawn. It's anti-American, I know, but there it is.
This is after the tree fell, not the way my yard looks normally, but you can get the 'picture'.

So instead what's a guy to do?
Stick his head into a 1969 Coronado 25's greasy encrusted motor well and pull out  'stuff', empty a few lockers, pull a few wires and hook up a few circuits?

Sure, I'm in.

 One motor well, 3 gas tanks. One big explosion potential :)

C25's have a motor well, meaning an enclosed space to hang a outboard motor, the 'white' device you see in the picture to the left is a 'plug' that covers the opening that an outboard would normally hang through.

 Tanks removed, you can see a wooden board to the right, that's a add on because the supports and structure that the well outboard hands on gave out many years ago and a previous owner, rather than repair it, decided to put a transom outboard mount on the boat.  Note that the board isn't doing so well either (check the bolts).

Lets have a little fun while we are here. What's worse than house wiring and wire nuts on a boat?
<-----------
Two house wires with wire nuts on a boat -------->

Patience fans, these wires did not survive the day on board.

The motor well, as is empty. A major project is to re-build the supports and such so we can move the outboard down here where it belongs but well worth the effort. Moving it will make it quieter and give the boat a cleaner "look", put the weight where it was designed to be and will include remote throttle connections etc, all of which beats the heck out of hanging over the stern when motoring.

The hatch on the stern is where the motor well is. It's pretty obvious that my Suzuki 8hp is not where one is designed to be. 60 pounds hanging here (and thrusting against the transom here, which is not 'structural') is not a good thing.

Anyway, that's later, and for after Marc gets his SeaKing outboard running.


We got every one of his circuits run, traced the wires to the v-berth, navigation lights, water, etc.. and finished powering up everything except his bilge pump and water pump - jury is still out on where those will go. On the way his cockpit locker got emptied and scrubbed out (a lot of wires ran through it) and his as designed battery locker (not the one pictured previously, a PO moved it) was emptied, de-spaghettied and generally made reasonable. No pictures because the "as is" still needs a bit of tidying up and scrubbing. You'll have to trust me, it's not looking like a wild man played pull my finger in there anymore.

Sunday, October 2, 2011

Electric Spaghetti

 I got permission from Marc to talk about him, his boat, and the projects he's working. That's good since he's already starred in two blog posts :)

I'd talk about my boat - but my lastest project was to clean out and paint my aft lockers on my swim platforms because they were moldy and crud filled. Not exactly blog worthy


Battery 'box' and such..


            The ground bus bar.
That's a couple of layers of Previous Owners there. Notice the wire nuts (orange). Even though these are the old style they are considered a no-no on boats as they aren't always a positive connection. Boats vibrate and move, houses do not.

Ah, that leads to the boat versus house discussion regarding wires. The standards organization for boats is ABYC (american boating and yacht council). This is a 1969 Coronado 25. It's 32 years old. It still works for the most part and it's been in service since before the ABYC was a twinkle in some OCD electricians eye. We'll be using the Chuck and Marc standard. Tinned wire in the bilge, butt connections and rings with positive (tested) crimps, tape or liquid tape seals. Proper gauges and black and red only. No purple for lights, yellow for signal or whatever the manual says.
By the way, Marc and I both have training by the military (him USAF, me USMC, USAF and USN), so we know enough to be dangerous.
You guessed it,we are making another previous owner layer - albeit with a change. Marc is ripping out the old stuff.

So off to Outdoor World (bass pro) to get some parts. Most boaters have two choices for big chain boat part stores, West Marine or Outdoor World. (WM or OW). OW is usually cheaper. Marc picked up a 6 circuit bus fused power panel and some other goodies and we were off ( I got my trolling motor on that trip). I prefer circuit breakers over fuses, it's not my boat, or my wallet.
Previously there were two 6 circuit power panels, to the left you can see one removed and hanging. Mark is playing the 'WTF' game as he unravels what was and figures out what will be.

Plan A was to rip out the old wires and re-run new wire to the limited number of circuits Marc envisioned needing on his day sailing, maybe an overnight here and there boat.
Plan A never survives the planning stage.

A small spool (25 feet) of wire goes for 30 bucks at OW. Heck, the old wires still work, why pull them and re-run. Off to Plan B use the old wires, pull out the un-used ones.

A funny thing about ABYC, which recommends tinned wires on boats because they don't corrode as fast. ABYC figuring doesn't accommodate facts such as the hordes of pre-ABYC decade(s) old boats that are still using non-tinned wires and working just fine.
Marc and Chuck standard = tinned in wet environments (bilge, outside). Whatever we got in the proper gauge inside.

In one short session (a three beer upgrade from 4:30 to 9pm) Mark wired in salon lights, powered up the Hummingbird and plotted out the course forward, to wit:
Navigation lights  which currently work (no re-run of wire) both red/green and stern
Forward interior lighting (same switch as salon)
Stereo/Electronics (i.e. Hummingbird)
12v outlet near hatch
Water pump - a previous owner gift as pressurized water on a 25 foot is unusual. He did however disconnect and leave in place the manual pump and outlet.

Since his 6 circuit panel was (interestingly enough) nominally labeled as 7 amps per, and 35 amps max it's actually enough for just about everything. Note if you will the math there, 7 x 6 is not 35. Hint, it's 42. Who turns on everything at once anyway...
You are thinking that is the interesting part?
Nope. Pre-installed bus fuses in each were 10 amp. Go figure.
Those of you that have actually read all of this are saying to yourself - HAH - Chuck forgot the:
bilge pump
It's wired direct (minus a 5 amp inline fuse) to the battery.
Anchor light
It's a 12v plug in and hang from the shrouds type, only draws .1 amp as opposed to the 1.3 amp.
Something else - okay, you got me, maybe we did.

Anyway, Marc just pulled into the drive way, time for round two (and to finish the painting in my locker.) 9:20 am on Sunday.
Isn't boat ownership fun?